


The Internet of Things (IoT) is the network of everyday objects — physical things embedded with electronics, software, sensors, and connectivity enabling data exchange. Basically, a little networked computer is attached to a thing, allowing information exchange to and from it.
There are mainly three components of IOT
a) Hardware - made up of sensors, actuators and embedded communication hardware
b) Middleware - on demand storage and computing tools for data analytics and
c) Presentation - easy to understand visualization and interpretation tools which can be widely accessed on different platforms and which can be designed for different applications.
For example, how nicer it would to check the status of your living room light and turn on and off the light without the need to be physically present in that room? Apart from laziness there could be several uses of this scenario. Another instance would be users with limited mobility who may have a difficulty in even reaching their light switch. Current light operating solutions are costly and often complicates the user environment.
I was particularly curios to develop a minimal cost option using IoT and so I created this sample project to turn on /off a LED light from anywhere using internet.
I can almost feel your excitement, so without further delay here is the recipe for achieving this.
List of items you need.
1. ESP2866 Wi-Fi serial transceiver module
2. Arduino Uno microcontroller board
3. Led lights
4. Wi-Fi connection
5. Bread board
6. 1 KΩ resistor.
7. Jumper connecting wires (Male to Male and Female to Male).
8. Decent amount of patience.
Now use these easy to follow steps to configure this:
1. Install the Arduino IDE – it is an open source software. Download link
2. Install the ESP8266 Board Package:
Arduino -> Preferences -> Additional Board Manager’s -> copy paste the URL -> http://arduino.esp8266.com/versions/2.3.0/package_esp8266com_index.json.
3. Now, restart Arduino IDE. Then continue: Tools -> Board -> Boards Manager. Search by ESP8266 Community. Click on the result and install it. Restart Arduino IDE again.
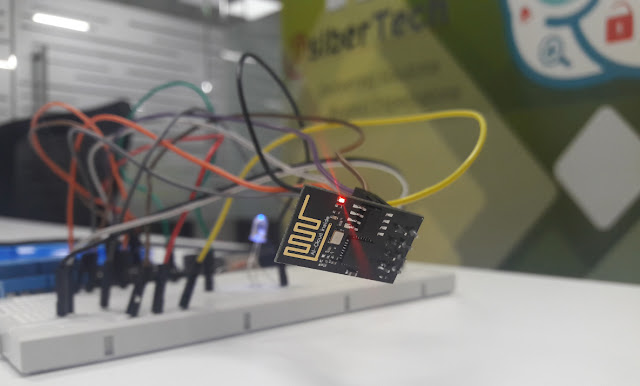
4. Give the wiring connections as shown.
5. Connect Arduino to system. Download this code and upload the sketch by clicking on upload button. Remember to give Wi-Fi name and Password. In the Serial Monitor (Top right corner of IDE - search icon – Click) you will get the IP Address of your ESP8266.
6. Change the IP Address in the downloaded code and flash the code again to ESP8266.
There you go, Enter IP address on browser. Now you can On/Off the LED from your local network. By Enabling Port Forwarding mechanism on your router, you can control this globally. Isn’t that amazing, few simple steps and viola a cutting-edge solution within the reach of anyone with a little bit of technical expertise.

Now the good news is, this does not limit to lights. Any electrical appliance can be controlled via this mechanism. The not so good news is, as every device is sending data frequently, Studying the data and extracting the information becomes the mammoth task of the day.
In Conclusion:
There is no denying that IoT will soon become a part of our day-to-day life. However how much of IoT integration will actually be helpful to the customer would be a major question. Organizations are implementing IoT just to get into the space and claim that their products are using latest technology. Often these terms are used for marketing alone. We must understand the people and their needs before implementing IoT related solutions.
List of items you need.
1. ESP2866 Wi-Fi serial transceiver module
2. Arduino Uno microcontroller board
3. Led lights
4. Wi-Fi connection
5. Bread board
6. 1 KΩ resistor.
7. Jumper connecting wires (Male to Male and Female to Male).
8. Decent amount of patience.

Now use these easy to follow steps to configure this:
1. Install the Arduino IDE – it is an open source software. Download link
2. Install the ESP8266 Board Package:
Arduino -> Preferences -> Additional Board Manager’s -> copy paste the URL -> http://arduino.esp8266.com/versions/2.3.0/package_esp8266com_index.json.
3. Now, restart Arduino IDE. Then continue: Tools -> Board -> Boards Manager. Search by ESP8266 Community. Click on the result and install it. Restart Arduino IDE again.
4. Give the wiring connections as shown.
5. Connect Arduino to system. Download this code and upload the sketch by clicking on upload button. Remember to give Wi-Fi name and Password. In the Serial Monitor (Top right corner of IDE - search icon – Click) you will get the IP Address of your ESP8266.
6. Change the IP Address in the downloaded code and flash the code again to ESP8266.
There you go, Enter IP address on browser. Now you can On/Off the LED from your local network. By Enabling Port Forwarding mechanism on your router, you can control this globally. Isn’t that amazing, few simple steps and viola a cutting-edge solution within the reach of anyone with a little bit of technical expertise.

Now the good news is, this does not limit to lights. Any electrical appliance can be controlled via this mechanism. The not so good news is, as every device is sending data frequently, Studying the data and extracting the information becomes the mammoth task of the day.
In Conclusion:
There is no denying that IoT will soon become a part of our day-to-day life. However how much of IoT integration will actually be helpful to the customer would be a major question. Organizations are implementing IoT just to get into the space and claim that their products are using latest technology. Often these terms are used for marketing alone. We must understand the people and their needs before implementing IoT related solutions.
If you have any questions or feedback regarding this project please feel free to write to me.
Cheers!

Vivek Sundarrajan
Full Stack Developer / Software Consultant
Email : vivek@psibertech.net
Skype : psibertech-vivek
No comments :
Post a Comment